Can Embroidery Digitizing Services Work From Photos?

Yes, Embroidery Digitizing Services can work from photos, but the quality and complexity of the original photo greatly affect the final embroidery design. A photo contains many details, colors, shadows, textures, and smooth transitions that cannot always be reproduced directly with embroidery thread. The digitizing process converts the important visual elements of a photo into stitches that an embroidery machine can understand.
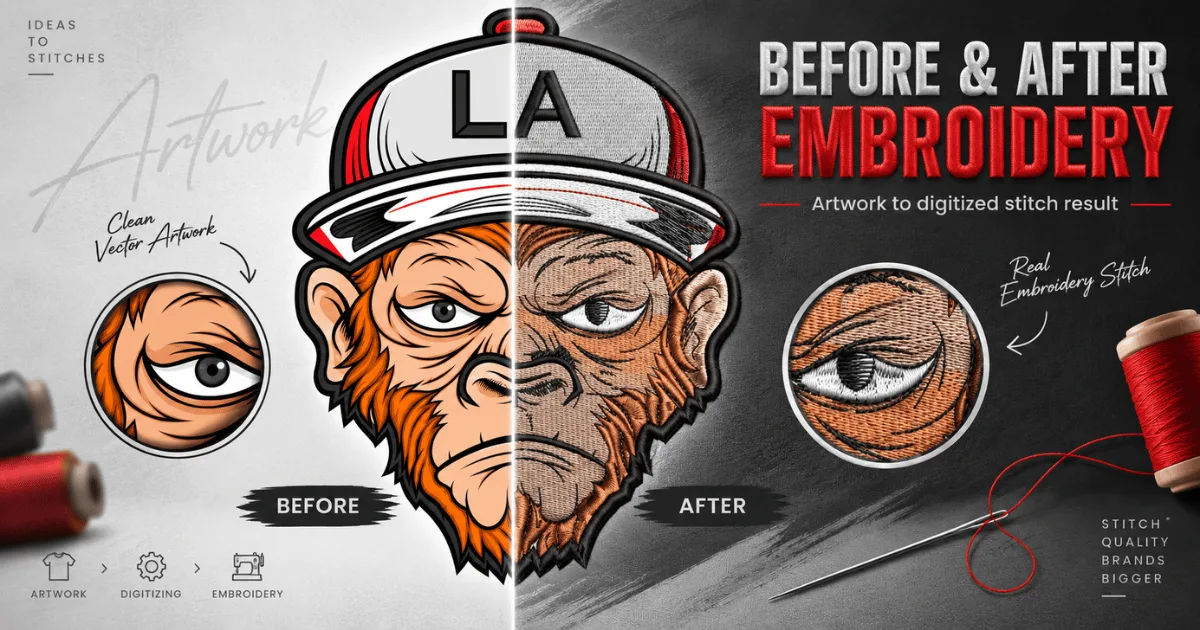
This does not mean that every photo can be converted into a perfect embroidered design with one click. Professional digitizing requires careful editing, simplification, stitch planning, and testing. A skilled digitizer studies the photo and decides which details should remain, which should be removed, and how each section should be represented with thread.
For businesses, clothing brands, sports teams, promotional products, and individuals, understanding how photo-based digitizing works can help set realistic expectations. With the right image and professional preparation, even a detailed photograph can become an attractive embroidery design.
What Is Embroidery Digitizing?
Embroidery digitizing is the process of converting artwork, images, logos, or other graphics into a digital embroidery file. This file contains instructions that tell an embroidery machine where to place stitches, what stitch types to use, and how different parts of the design should be sewn.
Unlike printing, embroidery does not reproduce an image using pixels or ink. It recreates an image through thousands of individual stitches.
A digitizer must therefore think about the physical properties of thread and fabric. Stitch direction, density, underlay, thread colors, pull compensation, and sequencing can all influence the final result.
Professional Embroidery Digitizing Services use specialized software to create these instructions. The resulting file may be saved in formats such as DST, PES, EXP, JEF, or other formats depending on the embroidery machine.
Can a Photo Be Converted Into an Embroidery Design?
A photo can be used as the starting point for an embroidery design. However, the photograph usually needs to be simplified before it can produce a practical embroidery result.
For example, imagine a photograph of a person's face. The photo may contain hundreds of colors, tiny skin details, hair strands, shadows, and highlights. An embroidery machine cannot reproduce all of these details in exactly the same way as a high-resolution printed photograph.
A digitizer may instead identify the most important features, such as the outline of the face, eyes, hair, clothing, and major areas of light and shadow.
The goal is not always to copy every pixel. The goal is to create an embroidered version that remains recognizable and visually attractive.
This is why experienced Embroidery Digitizing Services focus on interpretation rather than simple image conversion.
What Types of Photos Work Best?
Not every photograph is equally suitable for embroidery. Some images provide much better starting material than others.
Clear and High-Resolution Photos
A clear, high-resolution image gives the digitizer more information. Important edges and shapes are easier to identify.
Blurred or heavily compressed photographs can make the process more difficult because small features may already be unclear.
A sharp image is especially important when the design includes a person's face, animal, product, building, or other recognizable subject.
Photos With Strong Contrast
Images with clear differences between light and dark areas are generally easier to convert into embroidery.
For example, a black-and-white portrait with strong facial features can often produce an effective embroidered result.
Very low-contrast photographs may require additional editing before digitizing.
Simple Backgrounds
A simple background allows the main subject to stand out.
If a photograph contains a busy background with trees, furniture, people, buildings, and other objects, the digitizer may need to remove many unnecessary elements.
In many cases, eliminating the background creates a cleaner and more professional embroidery design.
Well-Lit Subjects
Good lighting makes important features easier to recognize. A subject that is properly exposed usually provides better information than one hidden in heavy shadows.
This is particularly important for portraits and photographs of animals.
How Do Embroidery Digitizing Services Convert a Photo?
The conversion process usually involves several important stages. Professional digitizing is more than uploading a picture into software and pressing a button.
Step 1: Analyze the Photograph
The digitizer first examines the image.
They identify the main subject, important shapes, color areas, outlines, and details. They also consider the intended embroidery size and the type of fabric where the design will be used.
This step helps determine whether the photo is suitable for embroidery and how it should be simplified.
Step 2: Remove Unnecessary Details
A photograph may contain many details that would create problems when translated into stitches.
The digitizer removes or reduces elements that are too small, visually confusing, or unnecessary.
This may include background objects, tiny textures, excessive shadows, and minor lines.
Step 3: Simplify Colors
A photograph can contain hundreds or thousands of color variations.
Embroidery designs generally use a limited number of thread colors. The digitizer therefore groups similar colors together and chooses thread shades that create the desired visual effect.
The number of colors depends on the design, embroidery machine, budget, and desired appearance.
Step 4: Create Stitch Areas
The major sections of the image are converted into embroidery objects.
These objects may use different stitch types depending on their shape and purpose.
For example, a large area may use fill stitches, while narrow outlines may use satin stitches.
Step 5: Add Underlay
Underlay stitches are placed beneath certain areas of the design.
They help stabilize fabric, support the top stitches, and improve the overall appearance.
The correct underlay can be especially important when working with clothing materials that stretch or move during stitching.
Step 6: Set Stitch Direction
Thread direction can affect how light reflects from the embroidery.
A skilled digitizer adjusts stitch angles to create visual separation between different sections.
Changing stitch direction can also make shapes appear more dimensional and polished.
Step 7: Adjust Stitch Density
Stitch density refers to how closely stitches are placed together.
Too many stitches can make the design stiff, heavy, or difficult to sew. Too few stitches can leave gaps and reduce definition.
Professional Embroidery Digitizing Services balance stitch density with fabric type, design size, and thread characteristics.
Step 8: Check the Design
Before production, the digitizer reviews the completed file.
Many professionals also use embroidery simulation software to preview how the design may look when stitched.
A test sew-out can provide even more useful information because the design is evaluated on actual fabric.
What Types of Photos Are Most Difficult?
Some photographs require much more work than others.
Detailed Portraits
Human faces are challenging because even a small change in the position of the eyes, nose, or mouth can affect recognition.
The digitizer must carefully choose which facial features to preserve.
A portrait intended for embroidery may therefore look more artistic or stylized than the original photograph.
Group Photos
Photographs containing several people can become complicated, especially when the final embroidery size is small.
Tiny faces may not have enough space for meaningful details.
For this reason, group photographs often work better when enlarged or simplified.
Landscapes
Landscapes can contain large numbers of small elements, including mountains, trees, buildings, clouds, and water.
Trying to reproduce every detail may create an overly dense design.
A digitizer may instead focus on the major shapes and create a simplified artistic representation.
Photographs With Many Colors
Colorful photographs can require extensive editing.
The digitizer must decide which colors are essential and which can be combined.
Using fewer thread colors can also make the design easier and more economical to produce.
Photo Embroidery vs. Traditional Embroidery Designs
Traditional embroidery designs are often created specifically with stitching in mind.
A logo, for example, may already contain simple shapes, clean outlines, and a limited color palette.
Photographs are different because they were usually created for visual display rather than embroidery.
This makes photo-based work more demanding.
Traditional artwork may therefore be easier to digitize than a highly detailed photograph. However, modern embroidery techniques can produce impressive photographic and realistic effects when the design is carefully prepared.
Professional Embroidery Digitizing Services can determine which approach is most appropriate for a particular image.
Does the Photo's Size Matter?
Yes. The intended embroidery size is extremely important.
A photograph may look excellent when viewed on a computer screen but lose important details when reduced to a small embroidered logo.
For example, tiny facial features may disappear if a portrait is stitched onto a small cap.
A larger embroidery area provides more room for detail.
Before digitizing, it is helpful to tell the digitizer the approximate final dimensions. This allows the design to be created specifically for its intended size rather than resized later.
Does Fabric Affect Photo Digitizing?
Fabric has a major impact on embroidery quality.
A smooth, stable material may allow detailed designs to remain sharp. Stretchy or loosely woven fabrics can require additional stabilization and careful stitch planning.
Caps, jackets, T-shirts, hoodies, bags, towels, and other products all have different embroidery requirements.
A design created for a flat jacket panel may not perform exactly the same way on a curved cap.
Experienced Embroidery Digitizing Services consider the final material when preparing the file.
Can Photos Be Used for Machine Embroidery?
Yes, but the embroidery machine does not directly understand a standard JPG or PNG photograph.
The photograph must first be converted into a compatible embroidery file.
The file tells the machine information such as stitch placement, stitch sequence, thread changes, and other production instructions.
This conversion is the main purpose of digitizing.
Simply converting a JPG into another file format does not create a proper embroidery design. The image must be professionally interpreted and converted into stitch information.
How Can You Improve a Photo Before Digitizing?
Providing a better source image can make the digitizing process easier.
Use the highest-quality original photograph available. Avoid screenshots when the original file is accessible.
Choose an image with good lighting and clear subjects.
If possible, remove unnecessary background elements before sending the image.
It is also useful to tell the digitizer what the finished product will be. Explain whether the design will be placed on a shirt, jacket, cap, bag, patch, or another item.
You should also provide the expected embroidery dimensions.
These details allow Embroidery Digitizing Services to create a design that is suitable for its actual purpose.
How Many Thread Colors Should Be Used?
There is no universal number of thread colors.
A simple design may need only a few colors, while a realistic portrait may require many shades.
However, adding more colors does not automatically make an embroidered photo better.
Too many colors can increase thread changes, production time, and cost.
A skilled digitizer chooses colors strategically. Similar shades can often be represented by carefully selected thread colors and stitch patterns.
The objective is to create the strongest visual result without making the design unnecessarily complicated.
Is Photo Embroidery Suitable for Logos?
Sometimes.
If a business logo is provided as a photograph, it is usually better to recreate the logo from the original artwork whenever possible.
A clean vector logo or high-quality digital artwork gives the digitizer clearer information.
However, if a company only has a photograph of an old embroidered logo, sign, product, or printed design, the photograph can still serve as a useful reference.
The digitizer can reconstruct the important shapes and lettering and create a new embroidery file.
Common Mistakes to Avoid
One common mistake is expecting a photograph to look exactly like a printed image after embroidery.
Embroidery has physical limitations. Thread behaves differently from pixels and ink.
Another mistake is using an image that is too small or blurry.
It is also important not to ignore the final embroidery size. A design that looks excellent at 10 inches may not work at 2 inches.
Choosing an unsuitable stitch density can also cause problems.
Finally, skipping a test sew-out can result in unexpected issues during production.
Why Professional Digitizing Matters
Automated software can convert some images into basic stitch files, but automatic conversion does not always produce production-ready embroidery.
A professional digitizer understands how fabric, thread, stitch types, density, and machine movement interact.
They can make decisions that software alone may not handle effectively.
This is especially important for photographs because photographs often require creative simplification.
Professional Embroidery Digitizing Services can transform an ordinary photograph into a design that is practical to stitch and visually appealing.
Conclusion
So, can embroidery digitizing services work from photos? Absolutely. A photograph can provide an excellent starting point for an embroidered design, particularly when the image is clear, well-lit, and contains a recognizable subject.
The important point is that photo-to-embroidery conversion is not simply an image-format conversion. A photograph must be analyzed and translated into stitches. Details have to be simplified, colors need to be selected, stitch types must be assigned, and the design needs to be adjusted for the intended fabric and embroidery size.
The best results come from treating each photograph as a unique project. A portrait may require different techniques from a landscape, while a product photograph may need a completely different approach from a business logo.
Choosing the right embroidery size is equally important. Fine details that work beautifully on a large jacket design may disappear when the same artwork is placed on a small cap.
Fabric should also be considered from the beginning. Different materials react differently to stitching, so stabilization, underlay, density, and stitch direction may need to be adjusted.
For anyone planning to turn a personal photograph, business image, pet picture, product image, or other artwork into embroidery, starting with a high-quality original image is one of the best decisions you can make. Providing information about the intended garment, material, size, and desired appearance can further improve the outcome.
Ultimately, successful photo embroidery depends on both the quality of the source image and the skill used to transform it. With careful planning and professional Embroidery Digitizing Services, a photograph can be converted into a durable, attractive, and highly personalized embroidered design.